OTA programming for the Atmega328P micro
A replacement bootloader for the Arduino to allow OTA (over-the-air) programming over a radio network.
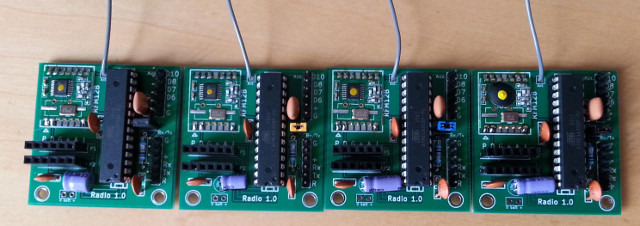
Code updates can be sent to a device over a radio network and saved on an I2C EEPROM. The bootloader can then flash the processor with the new code. This allows remote code updates to Arduino based radio devices.
The project is in several parts. The bootloader replaces the popular Optiboot bootloader and allows flashing of program memory from I2C flash. The run-time flash / I2C library implements a messaging system and simple file system that allows an I2C flash chip to be read and written remotely. My radionet library implements a messaging protocol that can carry the flash messages. I've also designed a PCB for a circuit that works with the code, but you can also use a JeeNode or similar device.
The boards I'm using are Atmega328 Arduino clones using the RFM12B 868MHz radio module. They are based on the JeeNode, an excellent board from JeeLabs.
Motivation
I've built a few systems based on the JeeNode and the RFM12B. I've designed my own messaging library and gateway device. This talks to a Raspberry Pi board which in turn feeds information into my IoT system and MQTT server.
I can change the host and gateway software easily, but modifying radio nodes involves finding them all, and connecting them to a PC to reflash them.
I started looking at designing a water meter reader. My water meter is in a hole in the pavement outside my house. The hole has a metal lid and slowly fills up with earth. After a few attempts at writing software for a device I decided I must have OTA programming. Digging around in a hole in the pavement was just too slow and messy. Some other devices are also difficult to get at, so I embarked on this project.
Remote flash file system
Using the Memory Plug from JeeLabs, I was able to add I2C flash capability to my boards.
I added a flash, I2C and pinio library to my radionet library. The main message handling is in flash.cpp.
This specifies a set of messages to query the flash, read, write, crc check and index the memory. A simple file system uses 8 slots which contain an 8 character filename, the address, size and crc of each file.
The radionet messaging interfaces through my gateway code and can be communicated with host side using flash_io.py. The low level message handling is in flash.py.
The Arduino code is all in C++ and C, the host side is all in Python.
A typical command to write a file to a remote device might be :
./flash_io.py -d relaydev_10 -W -s 0 -a 60000 -f <path>/radio_relay.hex
Each device on the radionet is referred to by name, in this case relaydev_10. This command writes (-W) at flash address 60000 (-a 60000), the file (-f <path>). The record (name, address, size, CRC) is written to slot 0 (-s 0).
A directory of the slots would look like :
$ ./flash_io.py -d relaydev_10 -D

00 ?OOTDATA    60000  15480 16A8 Error, crc=3FDD
01 FILEDATA        0      0 0000 Ok
02 --------        0      0 0000 Ok
03 FILEDATA        0      0 0000 Ok
04 FILEDATA        0      0 0000 Ok
05 FILEDATA   100000  18046 C1F5 Ok
06 FILEDATA        0      0 0000 Ok
07 FILEDATA    60000  15466 BD57 Ok
Slot 0 can be a boot record. These are marked with the name BOOTDATA. Once a boot record is written by the bootloader to application flash, the name is overwritten so it won't get re-flashed on the next boot. This accounts for the name ?OOTDATA in this directory.
To cope with sleepy nodes my gateway code implements store-and-forward. When a sleepy node wakes and sends a message to the gateway, it sets the ackrequest flag. If the gateway has a message waiting for the node it sends it in response to the ackrequest. In this way the remote file system works even for sleepy nodes.
The gateway code is in broker_talk.ino.
Bootloader
My modified bootloader is on GitHub
A bootloader is a short bit of code that runs when a device first boots. The default Arduino bootloader, Optiboot, is a very small bit of optimised code that allows you to reflash a part over the serial port. It is the bootloader that made the Arduino such a convenient device to use.
[Optiboot] fits in just 512 bytes of flash. The Atmega328 has a dedicated boot sector designed for the purpose. It can be set to be 512, 1024 or 2048 bytes in length. When the device resets it can be configured, via the fuse settings, to jump to the bootloader section of program flash.
I needed to add code to check for an attached I2C flash EEPROM, see if it contains code to flash into the processor's application flash, copy the code over and then mark the I2C flash as copied. I managed to squeeze this into 2k of memory. The optiboot authors did a great job getting their code into 512 bytes.
I had to make a few changes to the Optiboot code and Makefile to get it to work. The Makefile didn't have a setting for Linux. How could that be? I added that. I needed to change the location of the boot sector from 0x7E00 to 0x7800, 2k rather than 512 bytes from the end of the program flash. And I needed to build and link in my I2C libraries (here on GitHub)
To build the bootloader run this. I have only supported the atmega328 at this stage.
make LED_START_FLASHES=0 OS=linux atmega328
This diagram from the chip datasheet shows the memory map of the application and bootloader flash sections. On reset the processor needs to be configured to jump straight to the start of the bootloader section. The bootloader checks for an I2C flash, then waits for any serial port data from a programmer, then jumps to the application flash code.
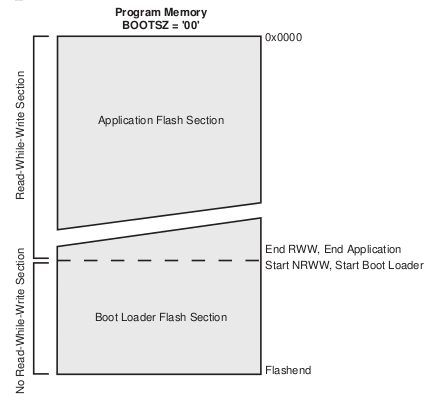
I had to change the fuse settings when burning the boot image.
To burn the bootloader I don't use the Arduino IDE, but a bash script, burn.sh, which expects to find a programmer on /dev/ttyUSB1. If you want to use the Arduino IDE to burn the bootloader, you need to modify boards.txt accordingly. For the programmer device I use a JeeNode device fitted with the JeeLabs Flash Board. This allows you to program a device via a SPI ISP (in-circuit-programming) port.
To make the development process easier I built a board with a ZIF socket and ISP interface. Here it is, sitting on the circuit diagram I used to build it. So you can make one yourself.
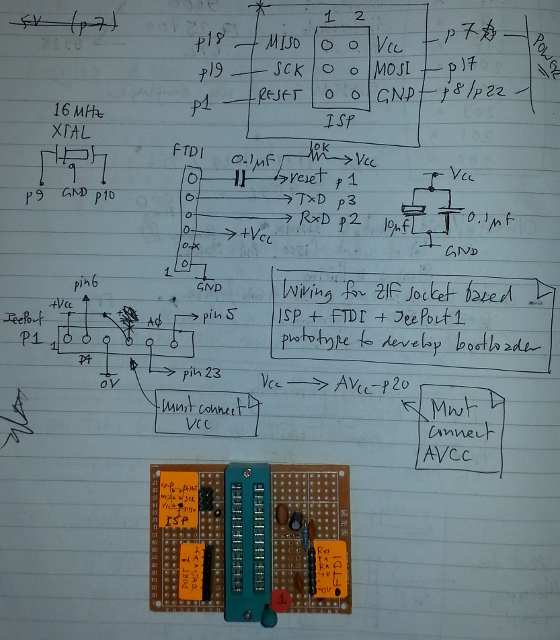
It has an FTDI interface, that can connect to a BUB board so I can test that the serial interface part of the bootloader is working. The ISP interface connects to the JeeLabs Flash Board for flashing the bootloader. I also added a JeeNode port (Port 1) to connect a Memory Plug. It is these I2C flash memory boards that I use to store files to flash onto the processor.
I was originally using the C++ JeeLib I2C library from JeeLabs, but the I2C code needs to work in the bootloader. I therefore wrote my own C library that could be optimised.
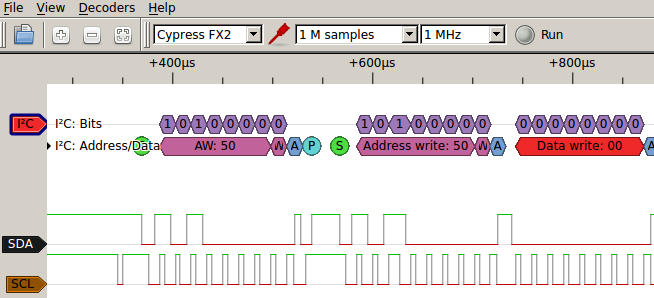
To help develop the I2C code I bought a very cheap logic analyser, the Hobby Components HCTEST0006. This works with the open source SigRok software pulseview. It allows you to produce real-time data captures with I2C protocol analysis like the trace below. This bit of test equipment is a really useful addition to the tool box. It would have been difficult to develop the I2C library without it.
I also wrote a simple sketch that allowed me to talk to the I2C flash filing system over the serial port rather than the radio, see flash_io.ino. This combined with a host-side python program allowed me to send files to the I2C flash on the development board. It was surprisingly easy to adapt the flash libraries for use over the serial port. The Python code makes extensive use of closures as callbacks. This is a simple way of writing event driven non-blocking code.
Board Design
I designed the board using KiCad, the designs are on GitHub. I got them made at SeeedStudio for very little money.
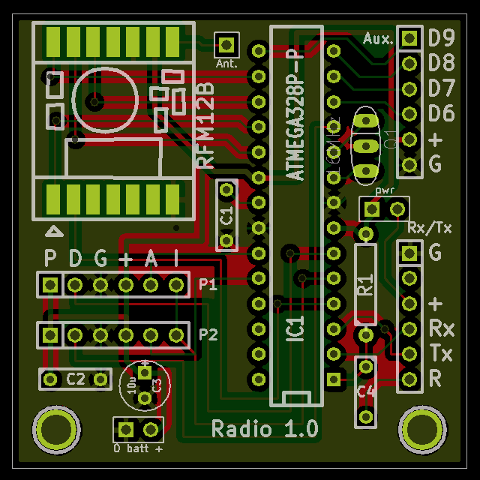
The board is heavily based on the JeeNode from JeeLabs. It has the same FTDI interface. It implements 2 ports (port 1 and 2) and the RFM12B radio module. I also added an auxilliary port with 4 digital io lines. I removed the 3.3V regulator, so you need to jumper the BUB board to provide 3.3V or you can provide the power on the battery connector or one of the other connectors.
These boards are largely designed to be battery driven. You need to watch the supply voltage for the RFM12B.
The intention is to add a surface mount I2C 128K flash chip to the back of the board when I layout version 2.0. The boards can therefore have a flash memory on board without taking up a port. It will use the spare analog lines, PC4-5. This will require a rebuild of the bootloader to specify these io lines.
Why am I still messing about with this 8-bit micro when everyone else is moving to either the ESP8266 or an ARM based chip? Well, I don't have surface mount facilities so if I want to make my own boards they have to be through-hole designs. The selection of through-hole ARM chips is tiny - either an 8-pin one (too small) or a 28-pin 0.5 inch device the size of a truck. So, for now, I'm sticking with the good old fashioned Arduino chip. With the OTA programming and a radio network it becomes quite powerful.
My radio and I2C flash libraries should work with an ARM based design, so I may be able to combine different technologies with the same air interface.

See also :
- JeeLabs Designs for similar hardware, a shop and excellent blog.
- LowPowerLab DualOptiboot a similar (SPI based) bootloader.
- AVR Bootloader FAQ by Brad Schick